• Home
  • Posts RSS
  • Comments RSS
  • Edit
Blue Orange Green Pink Purple

Make it Homemade Today

Don't let grocery stores steal your money by leading you to buy items just because of conveinence. Learn how simple and fun it can be to make frequently store bought items from your own kitchen. Besides, homemade just tastes better!

Tuesday, March 2, 2010

HOLY Macaroni!! (Homemade of Course!)


I don't know if there is a better comfort food than macaroni & cheese. The cheesiness is enough to appease any cheese fanatic! Those boxed meals are so easy and convenient and I'm sure all of us have had times where this a fast fix for your hungry toddler and your teenage son needed an afternoon snack.   I found this recipe that I'm sure will detour the habit of those boxed meals! This recipe is made stovetop and takes only the amount of time you need to cook the noodles and whala!!  A creamy, irresistible homemade mac & cheese that the kids will sure love! Forget the kids, that the adults will for sure love!! I like to add my own spicy kick by sprinkling in some creole seasoning! MMMMM! 

Here's two mac & cheese recipes, the first is this simple stovetop recipe and the second is a baked casserole mac & cheese.


Stove Top Macaroni & Cheese

Serves: 4, prep 5, total 15
8 oz elbow macaroni
1/4 cup butter
1/4 cup flour
1/2 teaspoon salt
1 dash black pepper
2 cups milk
2 cups cheddar cheeses, shredded

Directions:
1. Cook macaroni as directed on package
2. Meanwhile, melt butter in a separate saucepan. Add flour, salt, pepper. Gradually add in milk and bring to a light boil
3. Add in cheese & stir until melted
4. Pour over cooked noodles & enjoy.


Baked Macaroni & Cheese

16 ounces elbow macaroni
1/2 cup butter
1 teaspoon salt
1/2 teaspoon pepper
1/2 cup flour
3 1/2 cups milk
1 lb cheese (can use cheddar or velveeta)

Directions:
1. Preheat over to 350 degrees
2. In a pan melt butter, add salt pepper flour & stir until smooth
3. Add milk and bring to a light boil. Allow to boil for 1 minute
4. Remove from and and add cheese, stir until melted
5. Pour sauce over noodles and mix together. Place mixture in a casserole dish, sprinkle top with breadcrumbs and bake at 350 for 30 minutes.

Enoy and remember... homemade just tastes better.
Posted by Melanie- Northwest Arkansas Newborn, Family & Wedding Photography at 2:10 PM 2 comments:

Monday, February 22, 2010

Homemade doesn't have to be edible!

One of my biggest pet peeves is having to put a $20 tub of laundry detergent into my shopping cart, having to lug it home and having to pour out all of it into my laundry. I don't know why but that just bugs me and make me feel like I'm wasting my money. Money which could be used many many blocks of cheeses! ( just kidding, I've actually cut down my cheese fetish substantially!)  But seriously, money that could go towards a nice juicy steak or a pound of crab legs. I would much rather spend it on that instead. So my solution! Homemade laundry detergent! As with my first response, I'm sure all of you have a lot of questions or may be VERY leery about it.  Let me try to answer all the questions that have come up since I've been telling people that I use homemade laundry detergent.

Does it work?? YES! I tested a very stained old coat, amongst other things and it works great. If I have tough stains such as grease or chocolate,  (this actually happens quite a bit in my household)  I pour in a cap full of oxiclean (my stain buster of choice) and it gets the job done. We all do that anyways with regular detergent.

Does it smell good? YES! One of the best things about this type of detergent is that you get the choose your smell. Hobby Lobby and Wal Mart both have a great set of concentrated fragrance bottles to add to your detergent, which make your laundry and your laundry room smell magnificent!

Is it worth it? YES! I am maybe spending $4/month now on detergent. I don't even think it's that much because I haven't taken the time to do the math. As opposed to $20 previously. That's a savings of around $220 a year. Thats worth it to me!

Is it hard to make?? Not really. The hardest part is grating a bar of soap, your arm may get a little sore, but your working it out and your body will get use to it. The first few times I made it, my arm was a little sore but now I'm use to it.

Where can I find the ingredients? I have been able to find all the ingredients at the local Harps stores. Walmart does not carry all the ingredients (shame on you walmart).


So after all of that here is the final recipe. This makes a gell type of detergent. I use a cup per load. I have my good friend Brenda from work to thank for this recipe.


Homemade Laundry Detergent

1/2 bar of Zote soap, grated (found at harps)
1/2 c Borax (this can be found at Walmart but might as well buy at Harps since that's where everything else is)
1/2 c Arm & Hammer Washing Soda (not Baking soda but Washing soda, also found at harps)
1 bottle concentrated fragance (Walmart or Hobby Lobby)
5 gallon bucket (can be found at Lowe's or Home Depot type of stores)

Mix 4 cups of water with grated soap in pan. Heat until dissolved.
 Add Borax and Arm & Hammer washing soda. Boil 15 minutes. Watch very carefully so that it does not boil over and cause a mess. 
Pour into a 5 gallon bucket. Add hot tap water until the bucket is 3/4 full. Cover and leave alone for 24 hours.Then mix in 1 bottle concetrated fragrance.

Use 1 cup detergent for 1 large load of laundry. 

Dishwashing Detergent
Another great discovery lately is that two of the same ingredients I use for making laundry detergent can also be made for making dish detergent! 

Use 1 part washing soda for 1 part borax, mix between 1-2 tablespoons between both dispensers and  ese white vinegar as a rinse aid. I've found this to  work better than the leading dishwashing detergent and it saves even more money!! ENJOY! 


Posted by Melanie- Northwest Arkansas Newborn, Family & Wedding Photography at 11:46 AM 2 comments:
Labels: Dishwashing detergent, Laundry Detergent

Tuesday, February 9, 2010

Chinese if you Please!

So just recently one of my families favorite places to eat is P.F. Chang's. If you haven't had the priviledge of experiencing delicous gourmet chinese, I strongly suggest this restaurant. The first time we ever ate there, Austin, my now 13 year old step-son, stood in shock and asked with deep concern, "where is the buffet?" It still makes me laugh, but it's true we almost always consider chinese food to be second class buffet's or mall style fast food. It doesn't have to be that way. You don't even have to eat out at P.F. Chang's to get delicous chinese food. Here are a few recipe's my family has enjoyed without spending $20 per person.


P.F. Chang's Lettuce Wrap
For those of you who have never been to P.F. Chang's, these amazing lettuce wraps are one of their signature and most popular dishes. This recipe has been tried and tested by me and found to be true!! These are amazing! The recipe for the sauces is great too! You must you course ground mustard- other mustard's won't have that spicy kick!

Ingredients
3 tablespoons oil
2 boneless skinless chicken breasts
1 cup water chestnut
2/3 cup mushroom
3 tablespoons chopped onions
1 teaspoon minced garlic
4-5 leaves iceberg lettuce

Special Sauce
1/4 cup sugar
1/2 cup water
2 tablespoons soy sauce
2 tablespoons rice wine vinegar
2 tablespoons ketchup
1 tablespoon lemon juice
1/8 teaspoon sesame oil
1 tablespoon hot mustard
2 teaspoons water
1-2 teaspoon garlic and red chile paste

Stir Fry Sauce
2 tablespoons soy sauce
2 tablespoons brown sugar
1/2 teaspoon rice wine vinegar

Directions
1. Make the special sauce by dissolving the sugar in water in a small bowl.
2. Add soy sauce, rice wine vinegar, ketchup, lemon juice and sesame oil.
3. Mix well and refrigerate this sauce until you're ready to serve.
4. Combine the hot water with the hot mustard and set this aside as well.
5. Eventually add your desired measurement of mustard and garlic chili sauce to the special sauce mixture to pour over the wraps.
6. Bring oil to high heat in a wok or large frying pan.
7. Saute chicken breasts for 4 to 5 minutes per side or done.
8. Remove chicken from the pan and cool.
9. Keep oil in the pan, keep hot.
10. As chicken cools mince water chestnuts and mushrooms to about the size of small peas.
11. Prepare the stir fry sauce by mixing the soy sauce, brown sugar, and rice vinegar together in a small bowl.
12. When chicken is cool, mince it as the mushrooms and water chestnuts are.
13. With the pan still on high heat, add another Tbsp of vegetable oil.
14. Add chicken, garlic, onions, water chestnuts and mushrooms to the pan.
15. Add the stir fry sauce to the pan and saute the mixture for a couple minutes then serve it in the lettuce"cups".
16. Top with"Special Sauce".


P.F. Chang's Mongolian Beef
This recipe is absolutely divine! The freshness of the ingredients makes this one BETTER than the actual restaurants. If you are not famaliar with flank steak it is a very thin meat that runs anywhere between $7-$10/pound. Here in northwest arkansas I have found it at the Pinnacle hills neighborhood Wal-mart and at pinnacle whiteoak station.
Serves 2. Total time: 30 with 10 min prep.

Ingredients
2 teaspoons vegetable oil
1/2 teaspoon ginger, minced
1 tablespoon garlic, chopped
1/2 cup soy sauce
1/2 cup water
3/4 cup dark brown sugar
vegetable oil, for frying (about 1 cup)
1 lb flank steak
1/4 cup cornstarch
2 large green onions


Directions

1. Make the sauce by heating 2 tsp of vegetable oil in a medium saucepan over med/low heat.
2. Don't get the oil too hot.
3. Add ginger and garlic to the pan and quickly add the soy sauce and water before the garlic scorches.
4. Dissolve the brown sugar in the sauce, then raise the heat to about medium and boil the sauce for 2-3 minutes or until the sauce thickens.
5. Remove it from the heat.
6. Slice the flank steak against the grain into 1/4" thick bite-size slices.
7. Tilt the blade of your knife at about a forty five degree angle to the top of the steak so that you get wider cuts.
8. Dip the steak pieces into the cornstarch to apply a very thin dusting to both sides of each piece of beef.
9. Let the beef sit for about 10 minutes so that the cornstarch sticks.
10. As the beef sits, heat up one cup of oil in a wok (you may also use a skillet for this step as long as the beef will be mostly covered with oil).
11. Heat the oil over medium heat until it's nice and hot, but not smoking.
12. Add the beef to the oil and sauté for just two minutes, or until the beef just begins to darken on the edges.
13. You don't need a thorough cooking here since the beef is going to go back on the heat later.
14. Stir the meat around a little so that it cooks evenly.
15. After a couple minutes, use a large slotted spoon to take the meat out and onto paper towels, then pour the oil out of the wok or skillet.
16. Put the pan back over the heat, dump the meat back into it and simmer for one minute.
17. Add the sauce, cook for one minute while stirring, then add all the green onions.
18. Cook for one more minute, then remove the beef and onions with tongs or a slotted spoon to a serving plate.
19. Leave the excess sauce behind in the pan.
20. ENJOY TO YOUR HEARTS CONTENT!!!


Incredibly Easy Egg drop Soup
You won't believe how easy it is to make such an incredible soup.
Serves 2, prep 5 minutes, total 15 minutes

Ingredients
3 cups chicken broth
1/2 teaspoon salt
2 tablespoons cold water
1 tablespoon cornstarch
1 egg (slightly beaten)
1 scallion, with tops, finely chopped


Directions
1. Bring chicken broth to a boil in soup pot.
2. Add 1/2 teaspoon salt & mix.
3. Combine water and cornstarch; stir into boiling broth.
4. Stir a small amount of hot broth into slightly beaten egg. Add egg mixture into hot broth slowly, stirring all the time. Cook until clear and slightly thickened, stirring constantly.
5. Garnish with scallion.


Chinese Fried Rice
Serves 4, prep 5 min, total 25 min.

Ingredients
1 tablespoon butter or margarine
2 eggs, beaten
1 tablespoon butter or margarine
1/4 cup chopped onion
1/4 cup chopped green pepper (optional)
2 cups rice, prepared and cooled
1/2 cup cooked pork (optional) or cooked shrimp (optional) or cooked chicken (optional)
1/4 cup soy sauce
1/2 cup cooked peas (optional)

Directions
1. Melt 1 tablespoon butter in skillet or wok.
2. Scramble eggs in butter, breaking up the cooked eggs into small pieces.
3. Set aside.
4. Melt 1 tablespoon butter in skillet or wok.
5. Saute onions and/or green peppers in butter for 3 minutes.
6. Combine eggs, onions, rice, and meat.
7. Stir in soy sauce until color of rice is uniform.
8. Stir in peas.
9. Heat only until warm.


Enjoy your homemade Chinese cuisine, it will be so worth it!! Join me next week where I will share a few recipe's that aren't exactly edible!! God bless!
Posted by Melanie- Northwest Arkansas Newborn, Family & Wedding Photography at 5:01 PM No comments:
Labels: Egg Drop Soup, Fried Rice, P.F. Chang's Lettuce Wraps, P.F. Chang's Mongolian Beef

Monday, January 4, 2010

French Bread & all it's glory!


Upon just recently watching the wonderful movie 'Julie & Julia.' I was inspired to start my blogging once again. I found myself relating to the Julie character again and again. I too have always had problems finishing things. For instance my 3 year wedding anniversary is coming up soon and my wedding scrapbook is still not complete. I've finished a total of 4, maybe 5 pages. But you wouldn't believe the amount of time I've spent shopping and researching scrapbook items- definitely a lot more than the time I actually put into the scrapbook pages themselves. I've never been able to grasp why it is so hard to finish things, maybe I just get bored, or find something else more interesting. I don't know but probably would not have finished nursing school, had it not cost thousands of dollars.
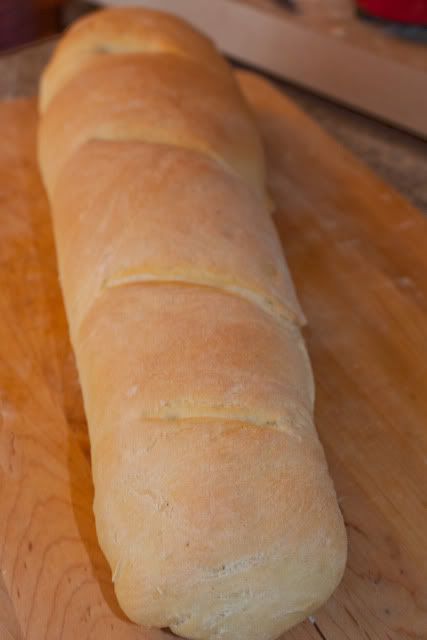
Anyways on to cooking. A wonderful gift I received this christmas from my mother was a kitchen stand mixer- a beautiful red one that matches my cherry red kitchen! I found this marvelous french bread recipe that is just divine. WOW do these stand mixers make it sooo much easier to make bread! Most bread recipe's seem to take hours to make because you have to let to dough rise twice and it also has to double in size. This particular recipe doesn't call for the dough to double! Which means less time till it's done! According to the author of the recipe, the trick to wonderful french bread is to not allow it to let it double, but to let it cook to its fullness. This recipe makes two beautiful loaves. If you don't have a french bread pan, you can shape it into 3 loaves so it'll fit onto cookie sheets a little better.
A couple tricks to create a wonderful crusty bread is to spritz the bread with water while it is cooking, or place a pot of boiling water underneath the dough in the oven.


French Bread

Ingredients:
2 1/2 cups hot water
2 tablespoons shortening
2 teaspoons salt
2 tablespoons sugar
2 tablespoons instant yeast
6 1/2 cups all-purpose flour

Directions
1. Place hot water in large bowl.
2. Add the shortening, salt and sugar.
3. Stir and let stand until lukewarm.
4. Sprinkle yeast over all. Allow it to foam for about 10 minutes
5. Beat until smooth.
6. Add 3 cups flour and beat until mixed.
7. Work in 2 cups flour with a wooden spoon.
8. Gradually knead the last 1-1/2 cups flour in until no longer sticky-about 3 minutes.
9. Cover and let rise for 30 minutes.
10. Punch down and place on floured board.
11. Roll out to a rectangle.
12. Cut lengthwise in half.
13. With each strip, roll up lengthwise and pinch seams.
14. Roll gently back and forth with hands to desired length and to smooth loaf out.
15. Lightly grease cookie sheet or use French loaf bread pans.
16. Cover and let rise for 25 minutes.
17. Cut diagonal slashes across bread about 1/4" deep.
18. Preheat oven, pour boiling water on large cookie sheet to fill.
19. Place cookie sheet on bottom rack in oven.
20. Brush loaves with warm water and place bread on higher rack in oven above water.
21. Bake at 350°F for 30-35 minutes.


After you pull your delicious bread out of the oven, and giggle with joy about its beautiful golden color, just dream of the endless possibilities of how you can enjoy your creation. My family chose to enjoy the first loaf with a delicous cheese fondue and and also with an olive oil dip. With the second loaf we choose to make cheesy bread using brie and parmesan-reggiano cheese. YUM! *Just an FYI - we didn't eat all this in one night!
A confession I need to make is that I have been on a cheese craze lately. I crave it all the time. And NO I am not pregnant. Just recently I counted over 10 types of cheese at one time in my fridge, which all included of course the basics of cheddar, parmesan, and cream cheese. I also had parmesean-reggiano, fontina, gorgonzola, smoked gouda, guyere, feta, blue cheese (which I hate by the way), monteray jack sliced sandwhich cheese, swiss and last but not least brie.
My cheese fetish started last September when my husband and I were on a trip to St. Louis and stopped at a cheese outlet somewhere along the way. There were so many choices of cheese, my senses just went wild and since then I haven't been able to stop.
Now which is my favorite? Well that depends on what it is and what I'm eating it with. If it's a sub sandwhich then my choice is provolone! If it's tossed in a salad then my choice is feta! If it's mixed in a casserole my choice is cheddar! My favorite for basic crackers & cheese - smoked gouda! AND I could keep going and going. Last week I made a trip to Sam's club where I had to stop dead in my tracks and admire the lavish array of international cheeses they possessed. Oh it was so hard to resist. Thanks to Dave Ramsey and our allocated spending plan - there was no money for an $8 block of delicious Spanish cheese. So I walked away, I resisted! One less cheese block to take up space in my fridge. After all this I'll admit I'm a little obsessed with cheese.
But the results are so amazing. Here are 3 beautiful recipe's enriched with cheeses to enjoy with your french bread!


Swiss Cheese Fondue

Ingredients:
6 cups shredded swiss cheese
2 cups shredded gruyere cheese
2 tablespoons cornstarch
2 cloves garlic, halved
2 cups dry white wine
2 tablespoons lemon juice
1/3 cup dry sherry or kirsch
1 teaspoon salt
1/4 teaspoon white pepper
French bread, cut into cubes

Directions
1. In a mixing bowl, combine the first 3 ingredients; stir to mix well; set aside.
2. Rub the inside of a large saucepan with the cut sides of the garlic halves; discard garlic.
3. Add the wine to the saucepan; cook over medium heat until hot, but do not boil.
4. Add in lemon juice.
5. Gradually add in the cheese mixture.
6. Cook unti cheese melts, stir constantly.
7. Add in sherry, salt, and pepper; stir to combine.
8. Transfer mixture to a fondue pot.
9. Serve with bread cubes for dipping.


Brie Bread

1/4 lb butter
6 ounces brie cheese
1/4 cup onion, diced
1/4 teaspoon basil
1 loaf French bread

Directions

1. Melt the butter in a sauce pan and onion and basil.
2. Cut the Brie into small pieces and add to the butter mixture.
3. Stir until the Brie is melted.
4. Slice the French Bread in half lengthwise.
5. Take each half and cut ALMOST all the way through into slices about 1 1/2
inches each
6. Spread the melted brie mixture over each half of the loaf.
7. Note: At this point you can refrigerate the bread/brie and continue just
before serving.
8. Place each half of the bread under the broiler until the cheese is bubbly.
9. Tear the individual pieces completely off the loaves and place on
serving platter.


Copycat Macaroni Grill's Bread Dipping Oil

Ingredients

1/2 teaspoon Italian seasoning
1/4 cup extra virgin olive oil
2 teaspoons Parmesan cheese (I used parmesean-reggiano!)
black pepper

Directions

1. Combine seasonings and olive oil top with Parmesan cheese.
2. Dip pieces of bread into oil.


Thanks for checking out my blog and remember... Homemade just tastes better!!! Next post I'll be blogging about copycat recipe's from a favorite Chinese bistro restaurant I found, something to do with lettuce, maybe? Check back in about a week to find out!
Posted by Melanie- Northwest Arkansas Newborn, Family & Wedding Photography at 12:20 PM No comments:
Labels: Brie Bread, French Bread, Macaroni Grill Olive Oil Dip, Swiss Cheese Fondue

Thursday, October 29, 2009

Boxed brownie mixes are so last season.

Making homemade brownies is so incredibly easy, you'll wonder why you ever spent money on them. I can almost guarantee that you will already have all the necessary ingredients for these in your pantry already.
Found this delicious basic brownie recipe in a Rachel Ray magazine and WOW, do they taste better than any Betty Crocker crocker mix!!!! SInce this is a basic recipe, be creative and add your own flair such as pecans, coconut, butterscotch chips or my favorite, ghiradelli chocolate chips!


Basic Homemade Brownies

2 cups sugar
1.5 sticks melted unsalted butter
1/2 tsp salt
3 eggs.
1 cup unsweetened cocoa powder
1 cup flour.

1. Preheat over to 350.
2. Grease a 9x9 inch baking pan.
3. In a large bowl combine sugar, butter and salt.
4. Whisk in eggs, one at a time.
5. Stir in cocoa and flour.
6. Transfer the batter to a baking pan and bake for about 25-30 minutes.
7. Let cool before enjoying.


No-Bake Cookies


I saw a package of no-bake cookies for sale at the local Harps grocery store bakery and I thought - theese are so stinkin easy to make, I can't see why people would buy them at the store. Here's my favorite no-fail recipe.

1/2 cup butter or margarine
2 cups sugar
1/2 cup milk
4 tablespoons cocoa
1/2 cup creamy peanut butter (or chunky)
3-3 1/2 cups dry quick-cooking oats
2 teaspoons vanilla

Directions
1. Add the first four ingredients into a 4-quart sauce pan.
2. Bring to a rolling boil and hold for 1 minute.
3. Remove from heat.
4. Stir in the next 3 ingredients and drop by tablespoons onto wax paper.
5. Let cool until set.
Posted by Melanie- Northwest Arkansas Newborn, Family & Wedding Photography at 1:45 PM No comments:
Labels: Basic Brownies, No-bake cookies

Friday, August 7, 2009

Presto it's Pesto!!


I just recently discovered this wonderful French dish at the grocery store- where it cost around $5 for a small jar. That's crazy!!! Well this recipe is sure to please and it doesn't cost anywhere near $5. It is addicting and can be used for SOO many meals. Try it tossed in pasta with a little added feta cheese and pine nuts (which is my favorite) or spread on crackers or bruscetta. It can also be spread on sandwiches, mixed in salads, the possibilities are endless. Be creative and enjoy! This recipe will stay good in the fridge for about 2-3 days but it also freezes well and would make a nice last minute meal for family/friends that show up at the last minute! And remember, Homemade just taste better!

Basil Pesto

Ingredients:
1 1/2 cups fresh basil leaves
2-5 garlic cloves (I like to use 4, but you will still be tasting garlic the next day.)
1/4 cup pine nuts
1/4 cup grated parmesan cheese
1/8 cup lemon juice
1/8 cup olive oil

1. Mix everything together in food processor except the oil and lemon.
2. Once everything is mixed well, drizzle with lemon and oil.
3. Mix until well blended.
4. Serve on pasta or just about anything that needs a pick me up.
Posted by Melanie- Northwest Arkansas Newborn, Family & Wedding Photography at 11:11 AM 1 comment:
Labels: Basil Pesto

Tuesday, June 30, 2009

I scream for HOMEMADE ice cream!

I believe the best homemade food you can make is ice cream, there is really nothing that beats it. Here is a truly homemade recipe from the recent Rachel Ray Magazine, you'll also find a recipe at the bottom for homemade heavy cream (it really works!) Have fun and enjoy!

Key Lime Pie Ice Cream
1 Quart

4 large egg yolks
3/4 cup sugar
1/4 teaspoon salt
2 1/4 cups heavy cream
3/4 cup milk
ice water
3 tablespoons key lime juice
3/4 cup chopped graham cracker

1. In a medium bowl, whisk together the eg yolks, 1/4 cup sugar and the sale.
2. In a medium saucepan, whisk the cream, milke and remainin 1/2 cup sugar over medium heat until just beginning to simmer, about 5 minutes.
3. Add to the egg mixture in a slow strea, whisking constantly, them pour into the saucepan.
4. Cook over medium-love heat, stirring constantly until the custard thickens and registers 175 degrees on an instant-read thermometer, about 8 minutes.
5. Strain the custard into a bowl set in an ice water bath; stir in the key lime juice. Let cool, the cover and refrigerate for at least 4 hours.
6. Using an ice cream machine, process teh custard according to the manufactuere's instructions. Fold in the graham cracks, then transfer to an airtight container and freeze until firm, about 4 hours.

Homemade Heavy Cream Substitute
Makes 3 cups

1 1/2 cups ricotta cheese or cottage cheese
1 1/2 cups vanilla yogurt

Directions
1. Combine the ingredients and mix until well blended and smooth.
2. Let stand at room temperature for 1 hour.
3. For best results, refridgerate at least 10 hours before using.
4. Use as needed.

Enjoy some hot fudge with your delicious treat!

Homemade hot fudge sauce
2 tablespoons margarine, melted
1/3 cup cocoa (Hershey's)
1 (14 ounce) can sweetened condensed milk
2 tablespoons water
1 teaspoon vanilla

1. In a microwave proof bowl, combine margarine, water and cocoa.
2. With wire whisk, blend in condensed milk.
3. Microwave on high 1 minute then whisk to blend.
4. Microwave 1 1/2 minutes more on high. Add vanilla and blend with whisk completely.
5. Serve over your favorite ice cream.
6. Store in 1 pint canning jar, cool and refrigerate.
7. Can be rewarmed in jar (lid removed) in microwave--add a bit of water if it thickens too much.


Homemade Sweetened condensed Milk
Makes 10 ounces

1 cup dry milk
2/3 cup sugar
1/3 cup boiling water
3 tablespoons melted butter

1. Put ingredients in blender and whip until smooth.
Posted by Melanie- Northwest Arkansas Newborn, Family & Wedding Photography at 4:46 PM No comments:
Labels: Hot Fudge Sauce, Key Lime Pie Ice Cream

Monday, June 15, 2009

Has the summer heat got you thirsty? Stay home and enjoy these delicious beverages!!!

Summers here and I know we all crave wonderful delicious beverages. I bet right now you could be thiking, a nice cherry limade from sonic sounds wonderful, or a candy bar blizzard from dairy queen? Well don't grab your keys and wallet- just walk into your kitchen and whip up these sure to be refreshing treats, made in your own home without having to whip out the cash.

Mocha Frappuccino (this is just as wonderful as a Starbucks frappuccino, just without having to pay $4-$5 dollars a glass) This recipe makes 2 glasses ($8 worth of savings!)

1/2 cup milk
2 tablespoons chocolate syrup
1 tablespoon granulated sugar, plus
1 teaspoon granulated sugar
1/3 cup strong coffee
1 cup ice

Directions
1. In a blender, combine everything but the ice, and blend until sugar has dissolved.
2. Add ice and blend until smooth (sometimes you will need a bit more ice).


Sonic Cherry Limade
Makes 1 glass

Ingredients
1 (12 ounce) can Sprite
3 lime wedges
1/4 cup cherry juice (Libby's Juicy Juice best)

Directions
1. Fill a 16 oz glass 2/3 full with ice Pour sprite over the ice.
2. add the juice of 3 lime wedges and drop them into the drink.
3. add the cherry juice and serve with straw.


Dairy Queen Blizzard
makes 1 16oz glass

Ingredients
1 Heath candy bar (or other candy of choice)
1/4-1/2 cup milk
2 1/2 cups vanilla ice cream (or chocolate)
1 teaspoon fudge sauce

Directions
1. Freeze Heath bar.
2. Break candy into pieces while still in the wrapper.
3. Combine all of the ingredients in a blender and blend on medium for 30 seconds or until well mixed.
4. Pour into a 16 oz glass.
Posted by Melanie- Northwest Arkansas Newborn, Family & Wedding Photography at 8:21 AM No comments:
Labels: Dairy Queen Blizzard, Mocha Frappuccino, Sonic Cherry Limade

Thursday, April 16, 2009

Seasonings Galore!

Here's an idea, instead of spending extra money on name brand seasonings, why not use the herbs and spices you probably already have in your cupboard and make it at home? It's super easy!! Here are some commonly used seasoning mixes and thier recipe's. Enjoys these with all your favorite dishes and marinades. Let me know what you think. makeithomemade@live.com

Mrs. Dash Seasoning

Ingredients
1/2 teaspoon cayenne pepper
1 tablespoon garlic powder
1 teaspoon basil
1 teaspoon marjoram
1 teaspoon thyme
1 teaspoon parsley
1 teaspoon savory
1 teaspoon mace
1 teaspoon onion powder
1 teaspoon sage
1 teaspoon black pepper

Directions:
1. Mix seasoning together & keep dry


Taco Seasoning Mix
this makes one package
2 teaspoons instant onion, Minced
1 teaspoon chili powder
1/2 teaspoon dried red pepper, Crushed
1/4 teaspoon dried oregano
1 teaspoon salt
1/2 teaspoon cornstarch
1/2 teaspoon instant garlic, Minced
1/2 teaspoon cumin, Ground

Directions
1. Combine all ingredients in a small bowl and blend well.
2. Spoon mixture onto a 6-inch square of aluminum foil and fold to make airtight. Label as Taco Seasoning Mix.
3. Store in a cool, dry place and use within 6 months.
4. Makes 1 package (about 2 T) of mix.


Old Bay Seasoning

1 tablespoon celery seed
1 tablespoon whole black peppercorn
6 bay leaves
1/2 teaspoon whole cardamom pod
1/2 teaspoon mustard seeds
4 whole cloves
1 teaspoon sweet Hungarian paprika
1/4 teaspoon mace

Directions
1. Place ingredients in a spice grinder or small food processor-grind well.
2. Store in a small glass.


Seasoning Salt

2/3 cup salt
1/4 cup garlic powder
1 teaspoon pepper
1/2 teaspoon oregano
1 teaspoon paprika
1/8 teaspoon celery seed, crushed
1/2 teaspoon onion powder
1/2 teaspoon dry mustard
1 teaspoon cornstarch

Directions

1. Mix well and store in airtight container.


As always you may click on the link to take you to more reviews and pictures and remember, homemade just taste better!
Posted by Melanie- Northwest Arkansas Newborn, Family & Wedding Photography at 8:30 AM 1 comment:
Labels: Mrs. Dash Seasoning, Old Bay Seasoning, Seasoning Salt, Taco Seasoning

Monday, April 6, 2009

Easters coming!

It's just around the corner and for those of you who have children, I'm sure they are anxious to begin coloring and having fun with Easter eggs. One way to save money during this holiday is to make your own egg dye! Try this recipe first!

Easter Egg Dye


Ingredients:
10 drops food coloring
1 teaspoon white vinegar
1/2 cup boiling water
1 tablespoon olive oil (optional)
glitter (optional)
white craft glue (optional)

Directions:
1. For each dye bath combine 1/2 cup boiling water with 1 tsp vinegar and 10 drops of food coloring in a bowl. Start with 5 drops red and 5 drops yellow, for orange for example, or 6 drops blue and 4 drops green for turquoise.
2. Dip hard-cooked eggs in dye bath for 3-5 minutes, extend time for richer color. Try using tongs to dip only half an egg in one color, then dip other half in a different color.
3. Use tongs or a slotted spoon to remove eggs and place on wax paper to dry, blot any excess with a paper towel.
4. For tie dyed eggs, add 1 tbsp olive oil to the mixture and stir with a fork. Roll egg gently in bath to pick of streaks of color. Remove egg from bath and blot oil off with a paper towel, then dry on wax paper. Once dry, lightly dip in another color if desired.
5. For glitter eggs, brush dried dyed egg with a thin layer of craft glue. Spoon glitter over egg, allow to dry on wax paper. To put glitter on only part of an egg (half blue, half red for example), use masking tape over the un-glittered part (or use stickers for shapes) and once dry remove masking tape and glue/glitter the remaining area.
6. For letters, numbers or shapes use small vinyl stickers (office or hardware supplies) and place them on the egg before dying. Once slightly dry peel off stickers gently. You can also use a white crayon to write names or draw pictures.
7. If you plan to eat your easter eggs, never leave them unrefrigerated at any point for more than 2 hours.

As always you can click on the recipe title to find reviews and pictures. Before too long, I will be putting my own pictures and reviews up, to make this blog more appealing!
Remember that homemade just tastes better, or in this case saves better!!
Posted by Melanie- Northwest Arkansas Newborn, Family & Wedding Photography at 1:49 PM No comments:
Labels: Easter Egg Dye

Friday, March 13, 2009

Watch out for flying rolls!

Well, you would have to watch out if you've ever visted Lamberts restaurant in Springfield Missouri. Also known as 'home of the throwed roll's.' This restuarant actually throws it's rolls across the rooms to their customers. It makes for very interesting meals! The food there is wonderful and the portions are huge! I recommend a visit whenever you get the chance. HOWEVER - this is about homemade baking, so why not whip up a batch of these and have some fun with your kids in the house and make your own kitchen, home of the throwed rolls!!

Lambert's homemade Copycat Rolls
Serves 12
25 minute prep,


Ingredients
1 teaspoon sugar
1 (1/4 ounce) package dry active yeast
1/4 cup tepid water(105-110 degrees)
1 cup warm milk
1/4 cup melted butter
1/4 cup sugar
1 egg, beaten (at room temp)
1 teaspoon salt
4 cups all-purpose flour

Directions
1. Combine sugar and yeast in tepid water.
2. Let stand 5-10 minutes until yeast begins to foam.
3. Thoroughly mix milk, butter, sugar, egg and salt in large bowl.
4. Stir in the yeast mixture and 3 1/2 cups of flour, adding a bit more if necessary to make a soft, pliable dough.
5. Turn dough out on floured board and let rest while you clean and butter bowl.
6. Knead dough gently 4-5 minutes, adding flour if necessary, until dough is smooth and silky.
7. Return to bowl, cover with plastic wrap, and let rise in warm place until doubled in size (1 1/2 hours appoximately).
8. Butter a 12 cup muffin tin.
9. Punch down dough.
10. Pinch off pieces that are about 1 1/2 inches in diameter, (enough to fill one-half of muffin cup), and roll into smooth spheres.
11. Place two such pieces in each prepared muffin cup- it will be a tight fit.
12. Cover dough loosely with plastic wrap for 45 minutes.
13. Bake rolls in preheated 350 degree oven for 20-25 minutes, or until light brown.
14. Serve as soon as they are cool enough to throw.


This next recipe comes from my all time favorite restarauant. The recipe itself also has to be a favorite. I don't know about you, but a good biscuit to me is about as a good as chocolate chip cookies! I love to make a warm batch is biscuits and devour them like I would chocolate chip cookies. Well maybe you don't feel the same way, but try this delicious copycat recipe of Red Lobsters Cheddar Bay Biscuits and let me know what you think. I like to add my own little touch by adding some Old Bay seasoning in them.

Red Lobsters Cheddar Bay Biscuits- Top Secret Version.
yeild: 9 biscuits
20 minutes prep, 40 total


Ingredients
2 1/2 cups Bisquick baking mix (can use the homemade version, see recipe below)
4 tablespoons cold butter
1 cup sharp cheddar cheese, grated
3/4 cup cold whole milk
1/4 teaspoon garlic powder
Brush on top
2 tablespoons butter, melted
1/2 teaspoon garlic powder
1/4 teaspoon dried parsley flakes
1 pinch salt

Directions
1. Preheat oven to 400°F.
2. Combine Bisquick and cold butter. Don't combine too thoroughly. There should be small chunks of butter about the size of peas.
3. Add cheddar, milk and 1/4 tsp garlic.
4. Mix by hand until combined, but don't over mix.
5. Drop 9 equal portions onto greased cookie sheet.
6. Bake for 15-17 minutes or until tops are light brown.
7. Melt 2 tbsp butter in a bowl. Stir in 1/2 tsp garlic powder and parsley flakes.
8. Use a pastry brush to spread garlic butter over tops of biscuits.


Homemade Bisquick substitute yeilds 10-12 cups

9 cups flour
1/4 cup sugar
2 1/3 cups powdered milk
1 tablespoon salt
1/3 cup baking powder
2 cups shortening

1. In a large pan, stir the dry milk, baking powder, sugar and salt into the flour; mix thoroughly.
2. Cut the shortening into the dry ingredients until the mix is the consistency of corn meal.
3. Place the mix in a covered glass or plastic container and keep in a cool, dry place.
4. In warm weather the mix should be refrigerated.
5. Use within a month.
Posted by Melanie- Northwest Arkansas Newborn, Family & Wedding Photography at 8:24 AM 2 comments:
Labels: Bisquick Mix, Lambert's Cafe Rolls, Red Lobster Cheddar Bay Biscuits

Wednesday, March 4, 2009

Say bye-bye to canned mixes

I have been making this recipe for over a year now and I LOOOVE it!! The first time I made this recipe I swore to myself that I would never waste my money on store-bought sloppy joe mixes because this is too WONDERFUL! I really hope you feel the same. You can also make the mix ahead of time, freeze it and take it out to thaw for an easy dinner or take it on a camping trip! Also enjoy the homemade hamburger buns along with them!

Homemade Sloppy Joe's
yeild: 4 Servings
time: 45 minutes, 15 minutes prep

1 lb ground beef
2-3 stalks celerey, chopped
1 small onion, chopped
1 (8 ounce) can tomato sauce
1/4 cup ketchup
1/4 cup barbecue sauce (your favorite, we use Open Pit)
1 tablespoon firmly packed brown sugar
1 teaspoon dry mustard
salt and pepper
1 tablespoon Worcestershire sauce
1 tablespoon vinegar

Directions
1. In a large skillet, brown ground beef, celery and onion.
2. Drain the fat, we don't need it anyways!
3. Stir in remaining ingredients, simmer covered, 15-20 minutes, stirring occasionally.
4. If Joes appear too'loose', leave cover off and let moisture evaporate.
5. Cook until it's the consistency you like for serving on toasted buns.

Homemade Sesame Hamburger Buns
yeild: 8 buns
Time: 3 1/4 hours. Prep time: 3 hours

Ingredients
1 1/2 cups warm water
1/3 cup instant milk
2 1/2 tablespoons vegetable shortening
3/4 teaspoon salt
1 1/2 tablespoons sugar
1 (1/4 ounce) package yeast
1/2 egg
5 cups flour, approximately
1 egg white
sesame seed, for sprinkling

Directions
1. Stir together the water, dry milk, vegetable shortening, salt and sugar (the shortening will not be dissolved and it doesn't matter).
2. Sprinkle the package of yeast over this mixture and let stand for about 5 minutes.
3. Add the 1/2 egg and 1/2 to 1 cup of flour.
4. Gradually add another 2 cups (approximately) of flour to make a sticky soft dough; knead on a floured surface for one minute (this isn't a particularly easy task), then scrape it back into your bowl and let it rest for 10 minutes.
5. Add about another 1-1/2 cups flour so dough isn't extremely sticky and knead dough until smooth and elastic.
6. Cover and let rise in a warm place (I like to let it sit on top of the clothes dryer), for about another hour and a half.
7. Grease a large cookie sheet.
8. Divide dough into 8 equal pieces and roll into balls.
9. Place dough balls on the greased cookie sheet and flatten each of them with your hand to form a 3 to 3-1/2 inch diameter disk.
10. Cover and let them rise another 45 minutes.
11. Preheat oven to 425 degrees F.
12. Brush tops with a little of the egg white (you won't use it all), then sprinkle with sesame seeds.
13. Bake at 425 degrees for 10 minutes, then reduce heat to 350 degrees and bake for about another 5 minutes.
14. Remove from sheets and cool on baking racks


You may click on the link on the title of the recipe's to be taken to its original location with reviews and pictures.

Please stop by next week where we will go over a few copy-cat recipes from some of your favorite restaurants. Who needs to spend $15 on an entree when you can make it at home!?

God Bless and remember, homemade just tast better!
Posted by Melanie- Northwest Arkansas Newborn, Family & Wedding Photography at 7:06 PM 1 comment:
Labels: sloppy joe's

Monday, February 23, 2009

Our First Homemade Item:

Who said homemade has to be difficult!? This is an incredibly easy way to save money and enjoy the great taste of homemade freshness. Try it and let me know what you think.

Homemade Italian Salad Dressing
yields 1 1/3 cup.
1 cup salad oil
1/3 cup wine vinegar
1 tsp salt
1 teaspoon sugar
1/4 teaspoon dried oregano leaves, crushed
1/4 teaspoon dry mustard
1/4 teaspoon paprika
1 garlic clove, minced

Directions
1. Combine all ingredients in a jar with a lid; cover and shake to mix thoroughly.
2. Let stand at least 2 hours to blend seasonings.
3. Shake well before using.
4. Wonderful on Italian lettuce salad.


Oh so yummy and simple. I love garlic and may even add two cloves to this recipe. Thanks for checking out my blog. You may click the link on the title to take you to the original website for this recipe which has great pictures and reviews. Till next time,
Remeber homemade just tastes better,
God Bless,
Melanie
Posted by Melanie- Northwest Arkansas Newborn, Family & Wedding Photography at 5:39 PM No comments:
Labels: Italian Salad Dressing

Make it Homemade Today

I love to cook, but one thing I love to do just about as much as cooking is saving money!!! So how much fun would it be to be able to do both at the same time? I've created this blog to help each other out. Lets find ways, recipes, share tips and gather ideas on ways we can all work together to cook and save money.
Don't we throw so many items in our grocery carts just because of convenience? Such as store-bought cookie dough? I've been guilty of this one!!! It's SOOO much easier to open a package and stick it in the oven than to deal with the mess of the flour, and dirty dishes. Plus I'm always trying to keep my 12 year old step-son from eating the entire batch of cookie dough.
There are MANY items out there that we could be making at home and saving money on, what about frozen biscuits, frozen pancakes, cream cheese spreads, italian seasoning mixes, bisquick mix and even hot pockets!!!
With a little extra time, skill and effort we can all create homemade items to enjoy and in the end save money. Next time you go to the grocery store think about all the things you find there that could potentially be homemade, let me know what you find.
Remember in the end, homemade just taste better anyways!
Posted by Melanie- Northwest Arkansas Newborn, Family & Wedding Photography at 5:21 PM No comments:
Labels: Welcome
Newer Posts Home
Subscribe to: Posts (Atom)

Homemade just tastes better!!

  • Prepackaged meals, boxed mixes and frozen cookie dough free zone.
  • Followers

    Labels

    • Basic Brownies (1)
    • Basil Pesto (1)
    • Bisquick Mix (1)
    • Brie Bread (1)
    • Dairy Queen Blizzard (1)
    • Dishwashing detergent (1)
    • Easter Egg Dye (1)
    • Egg Drop Soup (1)
    • French Bread (1)
    • Fried Rice (1)
    • Hot Fudge Sauce (1)
    • Italian Salad Dressing (1)
    • Key Lime Pie Ice Cream (1)
    • Lambert's Cafe Rolls (1)
    • Laundry Detergent (1)
    • Macaroni Grill Olive Oil Dip (1)
    • Mocha Frappuccino (1)
    • Mrs. Dash Seasoning (1)
    • No-bake cookies (1)
    • Old Bay Seasoning (1)
    • P.F. Chang's Lettuce Wraps (1)
    • P.F. Chang's Mongolian Beef (1)
    • Red Lobster Cheddar Bay Biscuits (1)
    • Seasoning Salt (1)
    • sloppy joe's (1)
    • Sonic Cherry Limade (1)
    • Swiss Cheese Fondue (1)
    • Taco Seasoning (1)
    • Welcome (1)

    Blog Archive

    • March (1)
    • February (2)
    • January (1)
    • October (1)
    • August (1)
    • June (2)
    • April (2)
    • March (2)
    • February (2)

    Food & Recipe Sites

    • Blog Catalog
    • RecipeZaar
    • Food Network
    • Taste of Home
  • Search


    • Home
    • Posts RSS
    • Comments RSS
    • Edit

    © Copyright Make it Homemade. All rights reserved.
    Designed by FTL Wordpress Themes | Bloggerized by FalconHive.com
    brought to you by Smashing Magazine

    Back to Top